
Signs of a Bad Roofing Job in Moreno Valley: Warning Signs
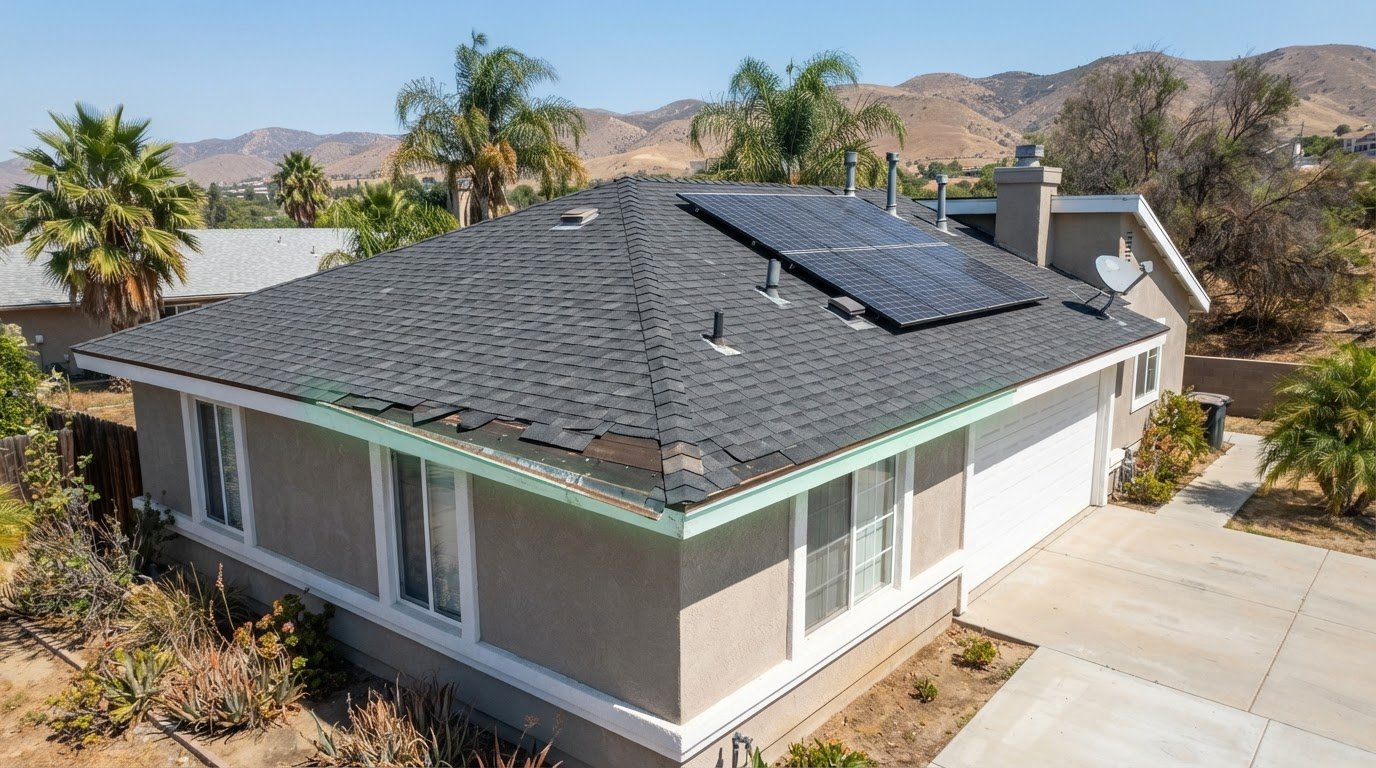
Solar panels, satellite dishes, and other rooftop equipment can obscure parts of a roof, but they don’t rule out visible warning signs. The clearest signs of a bad roofing job in Moreno Valley include sagging or uneven rooflines, missing shingles, exposed underlayment, missing edge details, and leaks that may point to installation shortcuts.
It’s reasonable to wonder whether rooftop equipment is hiding a problem. For homeowners in Moreno Valley and across the Inland Empire, including Lake Elsinore, Riverside, Orange, and San Diego Counties, this guide explains which warning signs deserve attention and what equipment may conceal. A ground-level view can reveal some issues, while others need a closer inspection.
Key Takeaways
- Look for rooflines that sag or appear uneven, as these may point to problems with the roof deck or framing.
- Scan for missing, cracked, or inconsistent shingles from the ground, and note any stains that could signal leakage.
- Learn how underlayment, drip edges, and flashing work together to help protect vulnerable roof areas from water.
- Watch for installation shortcuts, such as poorly placed nails or rushed work, that can leave shingles loose or increase leak risk.
- If you notice warning signs, arrange a roof assessment before a small concern leads to further damage.
1. Sagging rooflines and possible framing or roof deck problems
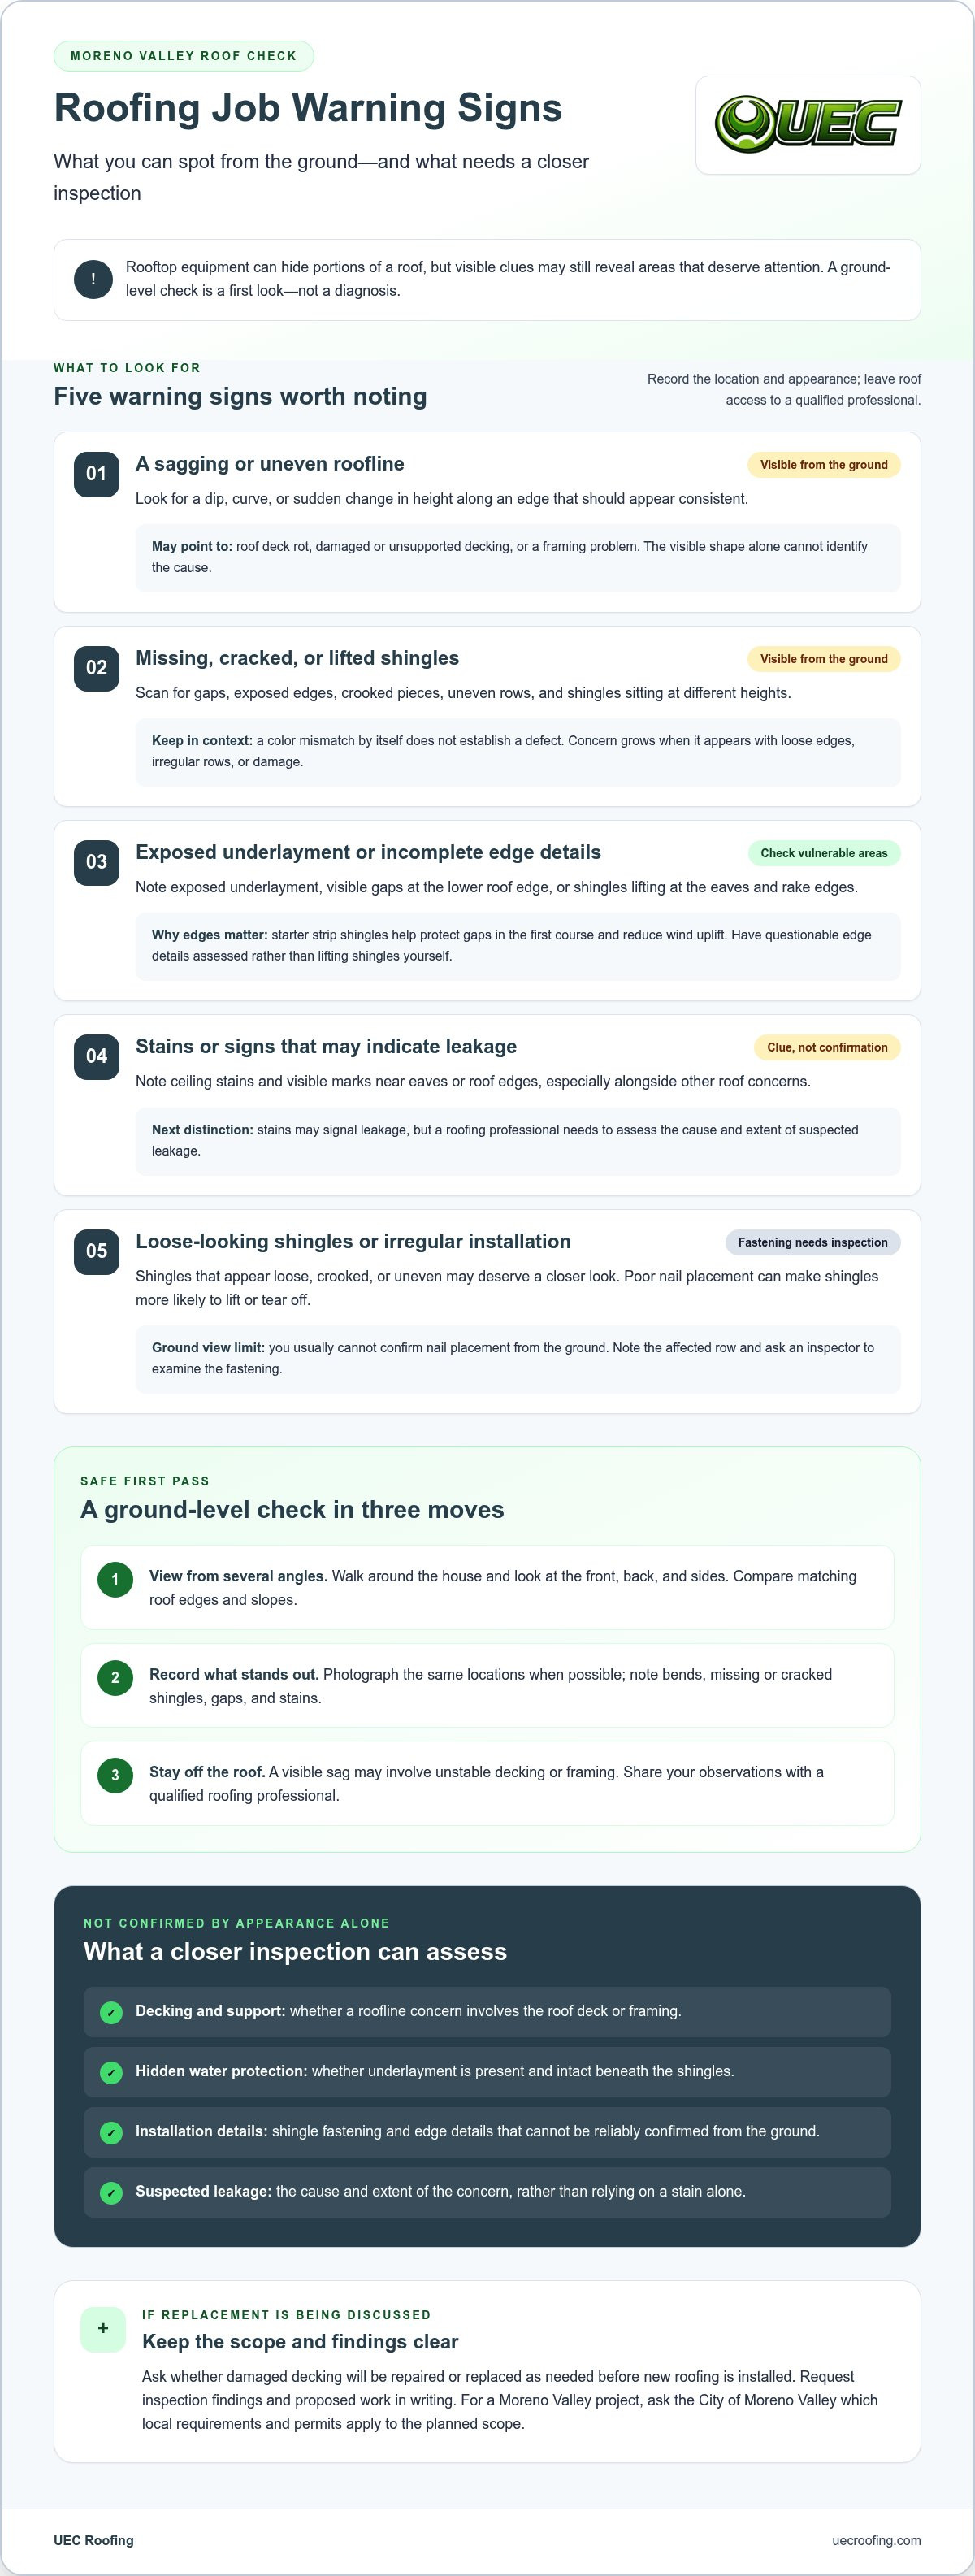
A straight roof edge should look consistent from one end of the house to the other. A dip, curve, or sudden change in height deserves attention, especially alongside lifted shingles or a ceiling stain. Signs of a bad roofing job in Moreno Valley can include an uneven roofline, but appearance alone can’t identify the cause.
Look from the ground at several angles, including the front, back, and sides. Compare matching roof edges and note where a line bends or dips. Take photos from the same locations, then compare them with earlier pictures if available. Don’t climb onto the roof to investigate; a visible sag may involve unstable decking or framing.
A roofline that dips can point to roof deck rot or a framing problem. Leaks may weaken the deck, while improper installation can leave damaged or unsupported areas beneath the roofing. Gaps in roof sheathing can also contribute to early shingle failure. The visible curve is a warning sign, not a diagnosis. An inspection should assess the decking and supporting structure before new roofing is installed.
Before signing a replacement contract, ask the roofing contractor to inspect the roof and explain how damaged decking will be addressed. The written scope should say whether the deck will be repaired or replaced as needed before the new roof is installed. Request the inspection findings and proposed work in writing. This gives you a clear record to compare with the finished work.
For a roof replacement in Moreno Valley, applicable California and local building requirements and permit needs depend on the project scope. Ask the City of Moreno Valley which requirements apply to the planned work before signing a contract.
To review a Moreno Valley roofer’s credentials, request the contractor’s license number and proof of insurance. Use the license number to check the official California license record and complaint history, then compare the recorded business name with the contract. Keep copies of the documents and note any differences that need explanation.
If a contractor disputes a visible dip, arrange an independent roof inspection before authorizing structural repairs or replacement. Give the inspector your dated photographs, ceiling-stain locations, and the contractor’s written scope. Ask for findings that distinguish roof-covering damage from decking or framing concerns. If work is underway, document the concern in writing and keep the contract, inspection notes, and project photos together.
2. Uneven rooflines and inconsistent shingle appearance
A close look at shingle rows can reveal installation issues that a broad view misses. From the ground, check whether courses appear straight and evenly spaced, then scan for cracked, lifted, or missing shingles. Uneven aging, visible gaps, and stains can also indicate trouble. Photograph each area from a safe location so you can show an inspector exactly what caught your attention.
Missing shingles soon after installation are a warning sign of poor workmanship. Also look for shingles at different heights, with exposed edges, or crooked beside neighboring pieces. A color mismatch alone doesn’t establish a defect; repairs or differences in material batches can affect appearance. Concern grows when color variation appears alongside loose edges, irregular rows, or damage.
Check the lower roof edges, including the eaves and rake edges, where the first shingle course begins. Starter strip shingles help protect the cutout gaps in that first course and reduce wind uplift. If edge shingles lift, gaps remain visible, or the starter strip appears absent, have the area included in a roof inspection. Don’t lift shingles yourself; doing so can damage the roof or obscure its original condition.
Nailing can explain why a shingle looks loose even when its surface appears intact. Nails placed too high may make shingles more likely to tear off, while improper placement can let them lift in strong winds. A ground-level view usually can’t confirm nail placement, so note the affected row and ask the inspector to examine how the shingles were fastened.
Installation defects don’t always appear right away. Problems with an improperly installed new roof may become apparent after about a year, as wind or weather exposes loose or damaged areas. Keep the contract, installation records, and dated photos together. If a defect emerges, compare the affected location with the written scope and document changes after any repair.
For a practical inspection, walk around the house without climbing onto the roof. Compare matching slopes, note missing or cracked shingles, and photograph stains near the eaves or roof edges. Record whether the concern appeared after installation or later. Share those observations with a qualified roofing contractor, who can assess the installation and explain which irregularities require repair. This helps distinguish cosmetic differences from patterns that may let water or wind affect the roof.
A ground-level visual inspection is a useful first step for identifying areas that deserve closer attention. Uneven aging, missing or cracked shingles, and stains are visible signs it may reveal, and they may indicate leakage. Treat these observations as reasons to note affected areas, not as confirmation of a leak. Looking across the roof from a safe position keeps the inspection focused on visible conditions, while a qualified roofing professional assesses the cause and extent of suspected leakage.
3. Missing underlayment
Roof underlayment sits above the roof decking and below the shingles. It adds a layer of protection that helps the roofing system resist water intrusion. Shingles remain the visible surface, so a neat, uniform roof doesn’t prove the underlayment was installed properly. A roofer may need to review installation records or inspect beneath the roof covering to assess whether this layer is present and intact.
Missing underlayment can leave the roof deck more exposed when water gets past shingles, around penetrations, or through damaged areas. The damage may develop out of sight before stains appear inside. Missing underlayment can make a 10-year-old roof appear at least four to five times its actual age. That aging effect can show up as widespread deterioration rather than one obvious gap.
Look for clues inside and outside. In the attic, note damp or discolored decking and water marks after rain. Outside, record recurring leaks, damaged roof edges, or areas where shingles have worn unevenly. These signs don’t prove underlayment is missing, but they help an inspection focus on vulnerable sections. Don’t lift shingles to look underneath; that can damage the roof and obscure its original condition.
A drip edge is metal sheeting installed at the roof perimeter to protect the board below the edge. If it’s absent, water can wet the roof decking or interior, contribute to mold or rot, stain exterior surfaces, and erode soil near the foundation. Check for a visible metal edge from the ground, especially along eaves and rakes. A roofing inspection can determine whether the edge detail is present and properly integrated.
Ice and water shield is a thicker form of underlayment that provides added protection in valleys and along eaves. Those areas collect or channel water, so an inspection should determine whether the roofing layers and edge details form a continuous protective path. In Moreno Valley, ask the roofer to show where underlayment and any specified shield appear in the project scope, rather than relying on a general promise of waterproofing.
A California workmanship warranty should clearly describe which installation defects it covers, how long coverage lasts, and what remedy applies. Read its exclusions, claim steps, and responsibility for related damage; don’t assume it covers material defects or every leak. Keep the signed warranty with the contract, photos, and inspection records.
For an existing roof, request a written assessment identifying the suspected location and evidence. For replacement work, compare the written scope with progress photos taken before shingles cover the decking. This creates a practical record of whether underlayment, drip edge, and valley protection were installed as specified.
4. Missing underlayment, drip edge, or flashing
Underlayment, drip edge, and flashing protect different parts of the roof, so one missing detail can leave a water entry point. Underlayment sits beneath shingles and helps waterproof the roofing system. A drip edge protects the board below the roof edge, while flashing directs water around joints and penetrations. After roof replacement, look for staining near ceilings, roof edges, vent pipes, and chimneys.
At vent pipes, shingles should overlap the flashing to help prevent leaks. From the ground, check whether shingles lie flat around each pipe and whether any flashing appears bent, loose, or exposed. Don’t climb onto the roof to inspect it. Note the location of any visible concern, then have a roofer examine the connection and the layers beneath the shingles.
At chimneys and roof-to-wall joints, flashing should direct water away from seams. A replacement estimate should identify new step flashing and chimney counter-flashing when the roof is being replaced. When hiring, review the written scope for these details instead of relying on a broad statement that the roof will be waterproof. Ask for project photos showing the flashing before shingles cover it.
Reused flashing creates a specific concern. Nails for the new roof may not align with holes in old flashing, leaving openings where water can enter. Reused flashing can create concerns during a new roof installation. Unfortunately, caulk or roofing cement used instead of metal flashing may fail within a few years. Look for recurring stains near a chimney, wall, or pipe, and compare them with the work scope.
After replacement, check the attic and ceilings for new moisture marks, especially below roof penetrations and valleys. Roof vents support air circulation; blocked or poorly functioning ventilation can allow moisture to build up, contributing to mold and rot. Note any musty odor, damp insulation, or discoloration, and include those observations in an inspection request. A stain may point to water entry, but its indoor position doesn’t always identify the roof opening.
Have the inspection cover the roof’s decking, underlayment, drip edges, and flashing, since problems in those layers can lead to premature leaks. Ask the roofer to explain any damaged or reused metal and document the proposed correction. Keep the contract, photographs, and inspection notes together. This record helps connect a visible stain or leak to the specific roof detail needing attention.
5. Roofing shortcuts and risk of leaks
A new roof should not leak, even during heavy rain. If water appears inside after installation, treat it as a defect to investigate, not routine settling. Note the date, weather, room, and exact location of each stain. A ceiling mark below a roof slope, for example, gives an inspector a starting point, though water can travel before appearing indoors.
Fastening errors are one shortcut that can leave shingles vulnerable. Nails placed too high can make shingles more likely to tear off, while crooked, underdriven, or overdriven nails can increase the risk of leaks and damage. Nail type, grade, and size should suit the roofing materials. Ask the roofing contractor to inspect affected shingles and explain how the fastening meets the installation requirements for that system.
Look beyond the roof’s appearance. A straight-looking surface can still conceal weak fastening or water entry points. Watch for lifted corners, exposed nail heads, shingles that shift in wind, and fresh stains inside the home. Take ground-level photos of visible changes and indoor photos showing the stain’s location. Don’t walk on the roof or pull at shingles to test their attachment.
An unusually short project timeline can signal rushed work, since a compressed schedule can lead to mistakes. A very low bid may also reflect cuts in material quality or worker experience. Compare the written scope with the work performed, including listed materials and installation steps. If a contract promises a particular material or repair, keep that document and photograph the finished area.
Roofing defects can remain hidden for months or even years, shortening a roof’s lifespan and potentially voiding manufacturer warranties. Problems with an improperly installed new roof may become apparent after about a year. Keep the contract, warranty, installation photos, and repair records together. If a leak develops, this timeline helps connect the symptoms with the roof work.
Water stains in an attic or ceiling deserve attention even when their source isn’t obvious. Photograph the stain, check whether it changes after rain, and note damp insulation or discolored decking from a safe attic location. Thermal imaging can help identify moisture signatures or cold spots behind drywall and insulation. Give your observations to a roofing contractor for inspection before covering or repainting the stain.
If a leak or installation concern needs a closer assessment, request roofing help and share the photos and project records. Clear documentation helps focus the inspection on the affected roof area and the installation details that may need correction.
UEC Roofing: leak repair
UEC Roofing helps Moreno Valley homeowners address leaks and other roof concerns through leak repair, roof repair, roof tune-ups, and broader Roofing Services. Its brick-and-mortar presence in Lake Elsinore and track record of over 2,000 successful projects in the region reflect its local roots.
If you’ve noticed a leak or want to discuss your roof’s condition, share your observations and any relevant project records with UEC Roofing. We provide leak repairs, roof tune-ups, and roofing maintenance to address concerns, from a specific leak to broader roof issues.
Contact UEC Roofing to discuss your roof.
Protect your roof with a clear next step
Recognizing signs of a bad roofing job in Moreno Valley is a reason to act thoughtfully, not rush into a major decision. Keep a record of what you’ve noticed, including photos, dates, and any changes inside your home. That information gives a roofing professional a useful starting point for assessing the roof and discussing next steps.
UEC Roofing provides leak repairs, roof tune-ups, and roofing services for homeowners addressing roof concerns. We can assess whether the issue calls for attention to a specific leak or a broader look at the roof. Share your observations with us to discuss the work that fits your situation.
Contact UEC Roofing about your roof. Taking a measured step now can help you move forward with greater clarity and protect the investment over time.
Frequently Asked Questions
Can Solar Panels, Satellite Dishes, or Other Rooftop Equipment Hide Signs Of A Bad Roofing Job?
Yes. Rooftop equipment can block sightlines to the roofing surface beneath or around its supports. Compare the equipment’s installation date with the roof project date, and review any available photos from before the equipment was installed. This timeline can help clarify which roof areas were visible during the original work and where an inspection may need to account for obstructed views.
Is It Safe for Homeowners to Walk on a Roof to Check Workmanship?
It’s safer to stay off the roof. Sloped, hot, or slick surfaces can make footing unpredictable, and walking may disturb roofing materials. Use binoculars from the ground or view accessible roof areas from an upstairs window. If you can’t see a section clearly, note its location for a professional assessment rather than using a ladder or stepping onto the roof.
What are common signs of a bad roofing job?
Look for several irregularities occurring together, rather than treating one cosmetic difference as proof of poor work. For example, compare similar roof slopes and consider whether uneven appearance follows a repair area or continues across an entire section. A written installation scope and dated project photographs can help distinguish planned material changes from unexpected inconsistencies.
How can I spot improper roof shingle installation?
Compare visible shingle placement with the work description and any progress photos taken during installation. Check whether completed areas look consistent across similar slopes, including around roof transitions. A homeowner’s visual review can flag concerns, but it can’t confirm hidden fastening details. Keep your observations specific, such as the slope or transition involved, so an inspection can focus on that part of the installation.
What roof leaks or water damage indicate poor workmanship?
Water inside a home doesn’t automatically prove the roof was installed incorrectly. Note whether moisture appears during or after rain, or at another time, and consider whether the location is near plumbing or another building system. This context helps narrow the possible source before repair work begins. A professional assessment can compare the timing and location with roof details and other possible causes.
What steps should I take if I suspect my roofer did a bad job?
Review the contract and workmanship warranty first, since they explain the agreed scope and the process for raising concerns. Send the contractor a concise written description of the specific issue and request a response under those terms. Avoid approving changes to the original work until you understand the proposed correction. If the explanation leaves key questions unanswered, an independent written assessment can provide another technical perspective.