
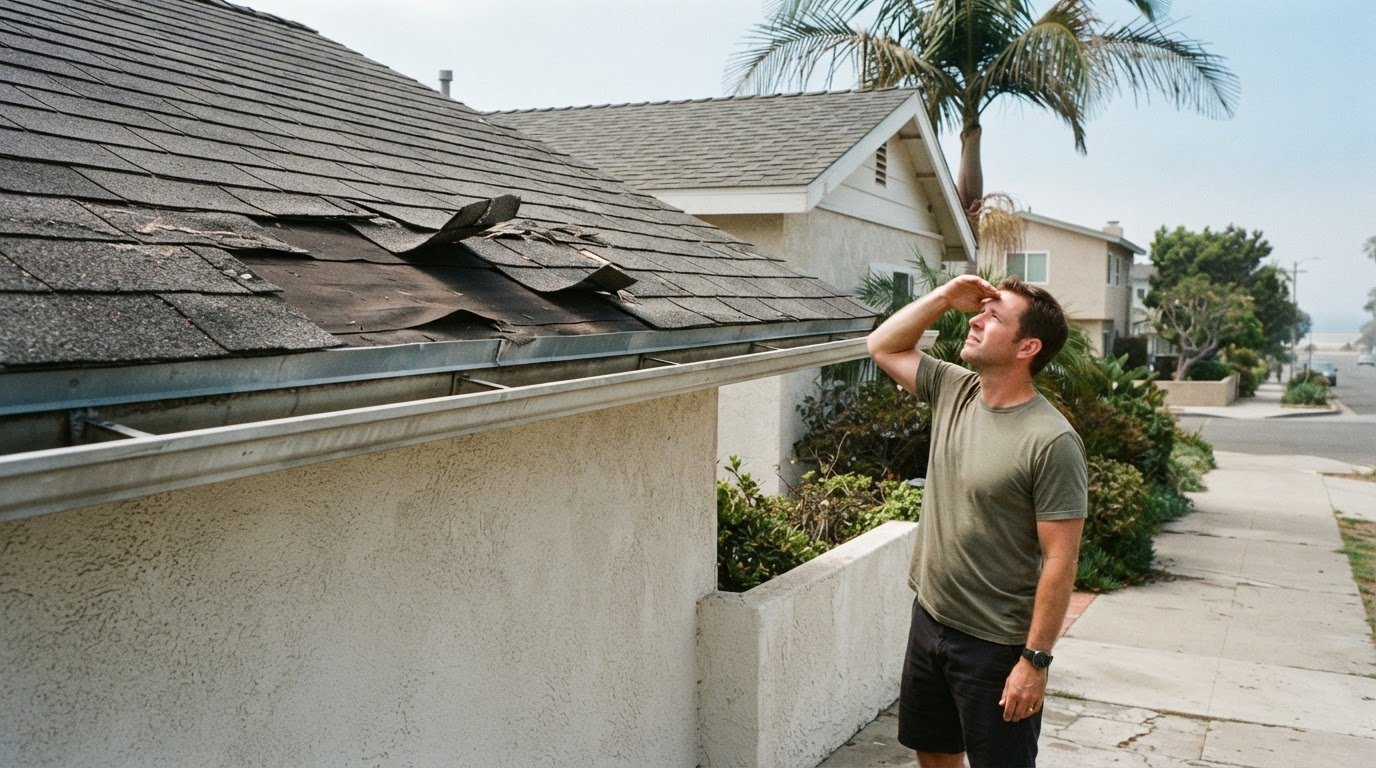
Roof damage can be visible from the ground before a leak appears indoors. To learn how to spot roof damage from the ground in Huntington Beach, look for cracked, missing, or shifted roofing materials, loose roof-edge details, debris, and sagging or uneven areas. These signs do not confirm the cause, but they can show when a closer inspection is needed.
A roof can look fine from inside even as it begins to wear. In Huntington Beach, coastal salt, sun, wind, and moisture can affect roofing materials without leaving obvious indoor signs. This guide explains what you can safely observe from the ground, what to look for after changing weather, and when an inspection can help identify the next step.
Key Takeaways
- Notice how coastal salt, sun, and moisture can leave visible clues on roof surfaces and metal details.
- Learn why an early inspection can help identify developing wear before it becomes an interior leak.
- After windy weather, look from the ground for displaced materials, debris, and changes along roof edges.
- Distinguish curled, cracked, missing, or lifted shingles by their shape and position on the roof.
- Use the roofline as a visual reference to spot possible sagging or uneven ridges without climbing.
1. Coastal salt corrosion, UV exposure, wind, and moisture
In Huntington Beach, salt in coastal air can settle on exposed roof fittings, flashing, and fasteners. Corrosion may become visible as rust-colored streaks, pitting, or deteriorated edges. From the ground, check metal valleys, vents, and roof-to-wall transitions. These details help direct water away from vulnerable joints, so visible corrosion is worth noting.
Sun exposure is another persistent stress on asphalt shingles. Fading, brittle-looking surfaces, and curling edges can signal wear, although ground-level views cannot reveal the full condition. With proper installation and maintenance from professionals like UEC Roofing, asphalt shingles can last 20-30 years. That range is not a visual diagnosis: roof slope, ventilation, installation quality, and exposure all affect how wear appears on a particular home.
Wind can lift roof edges and loosen materials, while moisture can exploit small gaps around flashing or penetrations. The National Oceanic and Atmospheric Administration states that a Category 1 hurricane has a wind-speed threshold of 74 mph. That figure is a storm classification, not a safe-wind threshold for a roof. After strong winds, look for displaced tiles, lifted edges, or debris collecting below rooflines.
Moisture clues may appear indoors before roof damage is obvious outside. The U.S. Environmental Protection Agency says indoor humidity levels above 60% can lead to mold growth. Check for musty odors, recurring ceiling marks, or discoloration near exterior walls, then note where they appear. Those signs can indicate moisture, but they do not by themselves identify the entry point.
Slate can last over a century, but its weight makes roof structure and installation important considerations. In coastal settings, proper flashing and underlayment support longevity by helping protect joints from moisture. From the ground, watch for slipped or missing slate pieces and irregular patches. A sound-looking slate surface does not show whether concealed flashing remains effective.
Synthetic roofing materials differ by product and installation system. Check the manufacturer’s coastal exposure guidance and applicable product ratings rather than assuming every synthetic roof handles salt air equally. For metal roofing near the coast, corrosion-resistant materials or alloys and sealing around fasteners can help prevent rust. Surface rust, streaks below fasteners, or damaged sealant are visible clues to record.
For a useful ground-level check, compare roof sections from several safe viewpoints. Note the material, affected slope, and nearby flashing or metal details. In Huntington Beach, several changes near one joint can help focus an inspection on coastal salt, sun exposure, wind movement, or moisture.
Homeowners should also note that coastal metal roofs can last 50 years or more, coastal clay tiles need suitable underlayment for moisture and may use S-tiles for better wind resistance, and concrete tiles need proper intersection sealing against moisture.
2. Early roof inspections
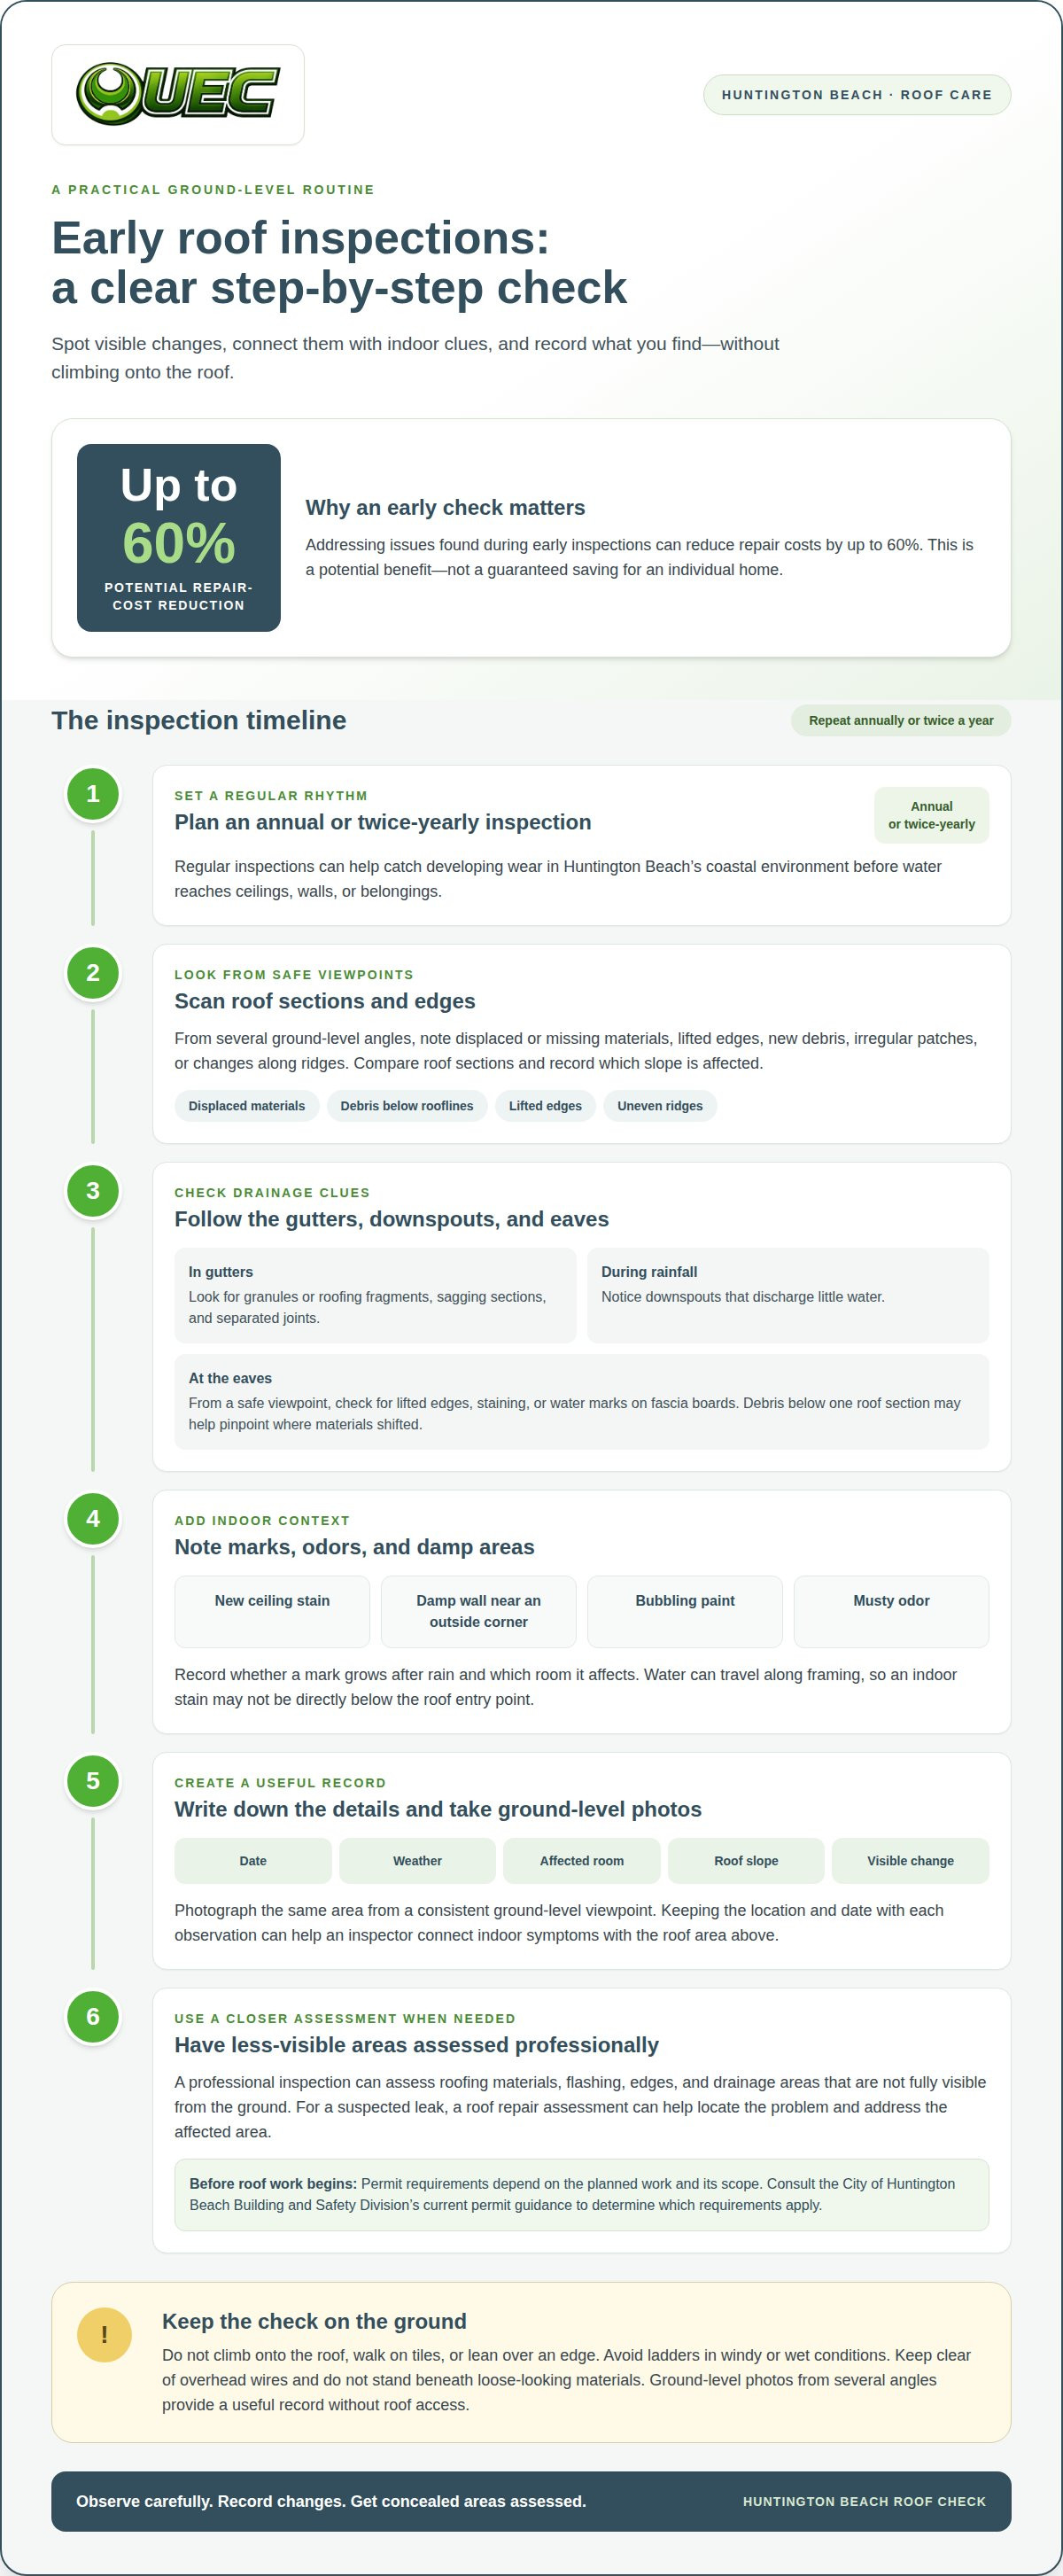
Early inspections help identify wear before water reaches ceilings, walls, or belongings. In Huntington Beach, an annual or twice-yearly roof inspection can help catch developing damage in the coastal environment. A visual check from the ground can help document visible changes such as displaced materials, new debris, or a fresh ceiling mark. Record the location and date so an inspector can connect indoor symptoms with the roof area above.
Timing matters because small defects can spread. Addressing issues found during early inspections can reduce repair costs by up to 60%. That figure describes the potential benefit of catching problems early, not a guaranteed saving on an individual home. A professional inspection can assess roofing materials, flashing, edges, and drainage areas that aren’t fully visible from the ground.
Permit requirements depend on the planned work and its scope. Before roof work begins, consult the City of Huntington Beach Building and Safety Division’s current permit guidance to determine which requirements apply to the project.
Gutters, downspouts, and roof edges provide useful clues. Look for granules or roofing fragments in gutters, sagging sections, separated joints, or downspouts that discharge little water during rainfall. At the eaves, check from a safe viewpoint for lifted edges, staining, or water marks on fascia boards. Debris beneath one roof section can help pinpoint where materials have shifted.
Indoor signs add context to an exterior check. A new ceiling stain, damp wall near an outside corner, bubbling paint, or musty odor can indicate moisture entering above or beside that area. Note whether the mark grows after rain and which room it affects. Leaks can follow roof penetrations or joints, and water can travel along framing before appearing indoors, so a stain may not be directly below the entry point.
Roof access carries fall risks, especially on wet surfaces, loose tiles, or steep slopes. Don’t climb onto the roof, walk on tiles, lean over an edge, or use a ladder in windy or wet conditions. Ground-level photos from several angles provide a useful record without putting you on the roof. Keep clear of overhead wires and avoid standing beneath loose-looking materials.
Prepare a concise inspection record: note the date, weather, affected room, roof slope, and visible change. Include photographs of the same area from a consistent ground-level viewpoint. If stains, debris, or damaged edges appear together, a professional assessment can connect those clues and identify the appropriate next step. For a suspected leak, a roof repair assessment can help locate the problem and address the affected area.
3. Wind and storm damage risks
In Huntington Beach, wind can stress roof edges, ridges, and exposed corners before damage is obvious indoors. A poorly installed roof can be damaged at wind speeds as low as 60 mph. This is a warning about installation vulnerability, not a threshold that makes every roof safe below that speed. Material condition, fastening, roof shape, and exposure all influence how wind affects a home.
Wind can lift a shingle or tile and allow gusts beneath it. From the ground, look for a changed line of roofing, exposed underlayment, displaced ridge pieces, or debris beside the house. Compare the visible roof shape with photos taken before the storm. A new irregular patch or gap can help distinguish recent movement from older wear.
Storm damage can also appear around roof transitions. From a safe location, look for bent flashing near a chimney, separated edges at a wall, or debris caught in a valley. Joints and edges direct water across the roof. If wind shifts a covering or exposes a seam, rain may enter there even when the rest of the roof appears intact.
After a wind event, use a consistent ground-level review. Note the date, wind direction if known, affected roof slope, and visible changes. Take photos from the same viewpoint, then include views of gutters, eaves, and the ground below. Fragments near one section can offer a useful clue, but they cannot show the full extent of damage.
- At the roof edge: Look for lifted or uneven shingle lines and loose-looking trim.
- At ridges and hips: Note gaps, displaced caps, or a newly uneven silhouette.
- Below the roof: Record broken roofing pieces, fresh granules, or fallen branches.
- Indoors: Watch for new ceiling marks after wind-driven rain.
Wind-resistant roof features can improve resilience to wind uplift by over 50%. That figure describes potential resilience from suitable features, not a guarantee against storm damage. The roof’s condition and installation still matter. A professional assessment can examine how the covering, edges, and fastening work together, including areas that cannot be judged from a sidewalk.
Don’t climb onto the roof to inspect storm damage. Wind may leave surfaces unstable, and wet tiles or shingles create additional fall hazards. Stay clear of hanging branches and loose materials. If you see an opening, active dripping, or a sagging section after a storm, document it from a safe place and arrange an assessment promptly. A clear record helps connect visible changes with the storm and affected roof area.
4. What do missing, curled, cracked, or lifted shingles look like from the ground?
Start by examining the roof’s pattern from a safe spot in the yard. Missing roofing can leave a distinct patch that contrasts with the surrounding rows. You may see exposed underlayment or a bare area near an eave. Learning how to spot roof damage from the ground in Huntington Beach starts with noting the slope and a nearby landmark, such as a chimney or window.
Curled shingles have edges or corners that turn upward. From the sidewalk, they may create a wavy line or uneven shadows across otherwise straight rows. Check the same area from another viewpoint. A shadow may shift as you move, while a raised edge remains visible against the roof surface.
Cracked shingles may appear as dark lines, split corners, or broken shapes that interrupt the pattern. Distance and glare can make details difficult to see. Binoculars may help distinguish a split from a stain, but don’t rely on one view if branches block the slope. Record what you can see without climbing.
Lifted shingles appear separated from the row below, with a visible gap or raised tab. Look for an edge that casts a persistent shadow, especially near the roofline. After windy weather, compare photos taken before and after the event. A new gap or irregular row can help identify a changed area.
- Missing: Look for a bare patch or exposed layer among intact rows.
- Curled: Notice raised corners, turned edges, or wavy courses.
- Cracked: Look for visible splits or broken corners interrupting the surface.
- Lifted: Check for gaps beneath tabs or edges that remain raised.
Color differences alone do not prove damage. Sun fading, dirt, repairs, and shadows can make one section look different from the rest. Focus instead on a changed shape, gap, or broken line. For a clearer comparison, photograph the full slope and affected area from the same ground-level position on separate days.
These visible clues can help homeowners learn how to spot roof damage from the ground in Huntington Beach, but they cannot show what lies beneath the roofing. Don’t pull at a lifted edge or climb to inspect a crack. Note the location, visible change, and any fragments on the ground. These details give a roofing professional a useful starting point for assessing the area.
Over 80% of homes in the U.S. use asphalt shingles. If that describes your roof, note whether the visible surface has lost pieces, developed a crease, or no longer lies in line with neighboring shingles. Keep the description tied to what can be seen from the ground rather than guessing at the cause. A wide view can show whether the irregularity is isolated or continues across a larger part of the slope.
When sharing observations, identify the slope by a nearby roof feature and say whether its appearance changed. Mention debris found below, but don’t assume it came from the roof unless it matches visible material. If signs are difficult to distinguish at a distance, leave the inspection to a qualified professional. A ground-level view records appearance, not hidden conditions.
5. How can you spot roof sagging, uneven ridges, or structural damage without climbing?
Start with the roofline, not the roofing material. From across the street, look along the ridge where the roof slopes meet. A straight ridge should look consistent from end to end. A dip, hump, or sudden change in direction deserves professional assessment. In Huntington Beach, take a photo from a fixed ground-level position so you can compare the same line later.
Compare the roof’s outline with stable features such as a chimney, gable, or neighboring roofline. A sagging section may look like a shallow bowl, a low spot between supports, or a dip near an eave. Look from the front and side of the house. One viewpoint can hide a change in shape, especially when trees or roof extensions block part of the slope.
Uneven ridge caps can create a stepped or wavy silhouette. Compare the ridge with the roof edges rather than judging one cap alone. A displaced cap may affect a small area, while a continuous dip across the ridge is a broader visual warning. Note whether the irregularity sits above a room, garage, or addition to help direct a later inspection.
Also examine roof-to-wall lines and the edges above porches or garages. A new gap, visibly bowed fascia board, or eave that no longer looks level can add context to a ridge change. Look for related clues, such as a door that suddenly sticks or a fresh interior crack nearby. One isolated clue does not establish the cause, but several changes in one area deserve attention.
Use a repeatable ground-level method:
- Choose a safe viewpoint: Stand on level ground away from overhead wires and traffic.
- Frame the whole slope: Include the ridge, eaves, and nearby chimney or gable.
- Compare angles: Photograph the same roofline from the front and side.
- Record changes: Note the date and the exact area that appears uneven.
Lighting can distort the outline. A tree shadow, strong afternoon glare, or projecting dormer can make a straight section look uneven. Recheck the same view in different daylight and compare photos rather than relying on memory. Don’t climb a ladder, walk on tiles, or lean over an edge to confirm a suspected dip. Ground-level images are safer and give an inspector a clear starting point.
A visible sag or changing ridge line calls for prompt professional attention, especially when paired with a new interior crack or door-frame change. Photos cannot show the condition of concealed framing, so a qualified assessment is needed to evaluate the structure. If you’ve noticed a change in your roofline, request help assessing the visible roof damage.
UEC Roofing
UEC Roofing helps Huntington Beach homeowners make sense of visible roof concerns and identify a practical next step. The company has a brick-and-mortar location in Lake Elsinore and a track record of over 2,000 successful projects across the region, including the Inland Empire and Riverside, Orange, San Diego, Los Angeles, and San Bernardino Counties.
When a roofline change, damaged material, or interior moisture raises concern, UEC Roofing can assess the issue. Depending on the findings, a roof tune-up or leak repair may address the home’s needs. Ground-level observations provide a useful starting point, while an inspection helps clarify what the roof requires.
Contact UEC Roofing to discuss the signs you’ve noticed and schedule an inspection. A clear assessment can help you choose the next step for protecting your home.
Turn Your Observations Into a Clear Next Step
Knowing how to spot roof damage from the ground in Huntington Beach is most useful when observations lead to a practical plan. Keep your photos and notes together, then use them to explain what changed and where. A clear record makes the next conversation more focused.
UEC Roofing provides Roofing Services for homeowners assessing roof concerns, including roof tune-ups and leak repair when those needs fit the situation. The right next step depends on what an inspection finds, not on a guess from the street.
For a professional look at your roof, contact UEC Roofing to discuss an inspection. A thoughtful assessment can help you make an informed decision and protect your home with confidence.
Frequently Asked Questions
What roof damage can homeowners safely spot from the ground?
From a yard or public sidewalk, look for changes in the roof’s outline, displaced materials, fallen debris, and gaps where roof surfaces meet walls or chimneys. A new gap or separated edge may be easier to notice against a straight architectural line. Use camera zoom from a stable position and note the affected side of the home. Don’t climb or reach over an edge for a closer view.
What roof damage signs are common after wind or rain in Huntington Beach?
After wind or rain, check for fresh roofing fragments, a changed roofline, water marks near exterior wall corners, and new dampness around ceiling fixtures. Wind-driven rain can enter at vulnerable joints and appear indoors away from the entry point. Note whether a gutter overflowed during rainfall, since blocked drainage can resemble a roof leak. Record where each sign appeared and whether it followed the same weather event.
When should Huntington Beach homeowners call a licensed roofing contractor for an inspection?
Arrange an inspection when a ceiling mark returns after rain, water is actively entering, roof materials appear displaced, or a ridge seems to have changed shape. These signs warrant timely attention because a ground-level view cannot reveal concealed damage. Share dated photos and identify the affected room or roof slope. UEC Roofing provides roof repair and leak repair for concerns identified during an assessment.