
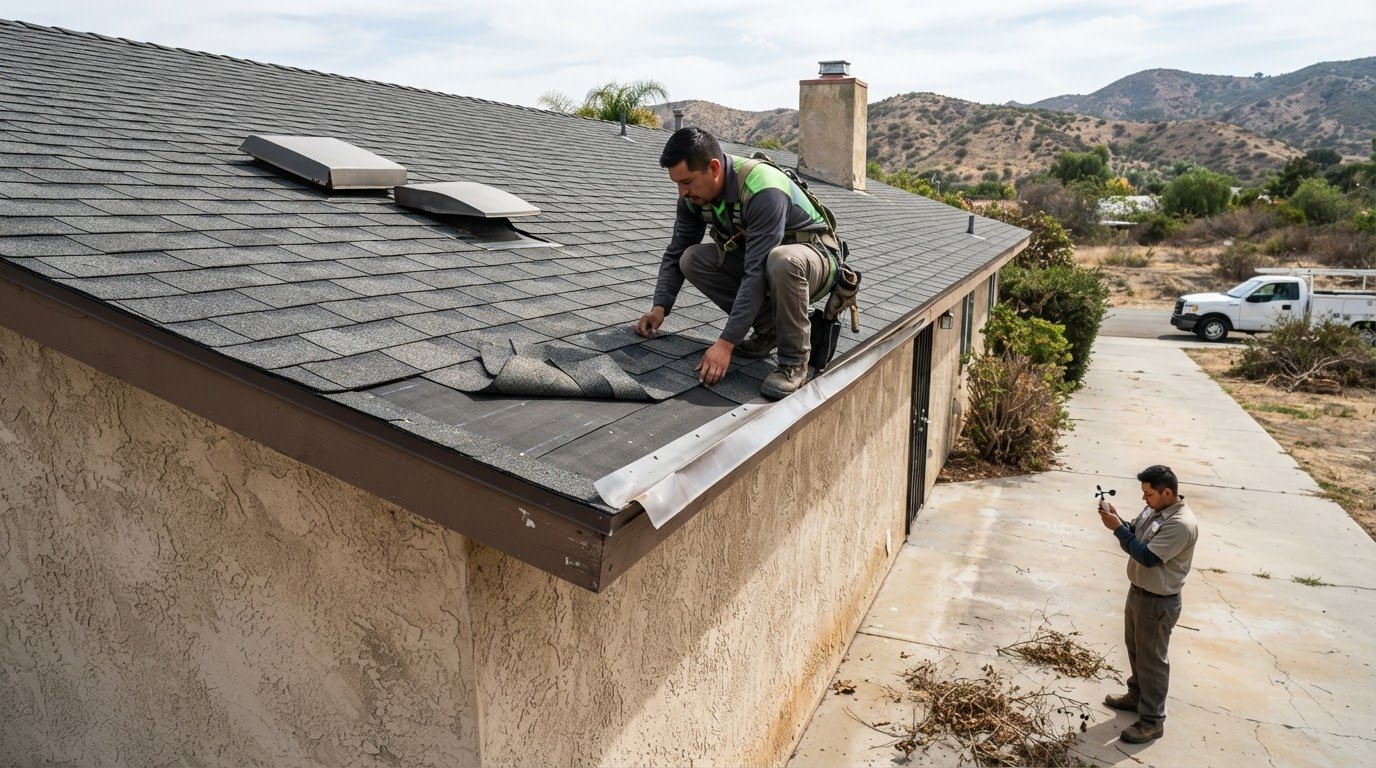
Wind can damage a roof without leaving an obvious opening. A wind damage roof inspection in Riverside looks for lifted or displaced roofing, loosened edges, and other signs that the roof’s protective layers may be compromised. Wind conditions are often described by both steady speed and short-lived gusts.
It’s natural to focus on how strong the wind felt, but a weather reading alone can’t show what happened to a particular roof. The roof’s condition, wind direction, and visible changes to roofing materials all help tell the story.
This guide explains how wind affects roof components, how wind speed is measured, and what you can safely look for after a storm. You’ll also learn why a ground-level exterior check is a sensible first step and when a professional inspection can clarify whether repairs are needed.
Key Takeaways
- Start with a ground-level check after a storm, and leave roof access to trained professionals when conditions or damage make it unsafe.
- Learn how lifted shingles, shifted tiles, loose flashing, and damaged vents can signal wind-related problems.
- Understand why wind readings provide context but a roof’s visible condition and vulnerable details matter during an inspection.
- See when damage calls for a professional assessment and what to document for a potential insurance claim.
- Find out how Riverside permit and code considerations may relate to the scope of roof repairs.
How to inspect a roof for wind damage safely after a storm?
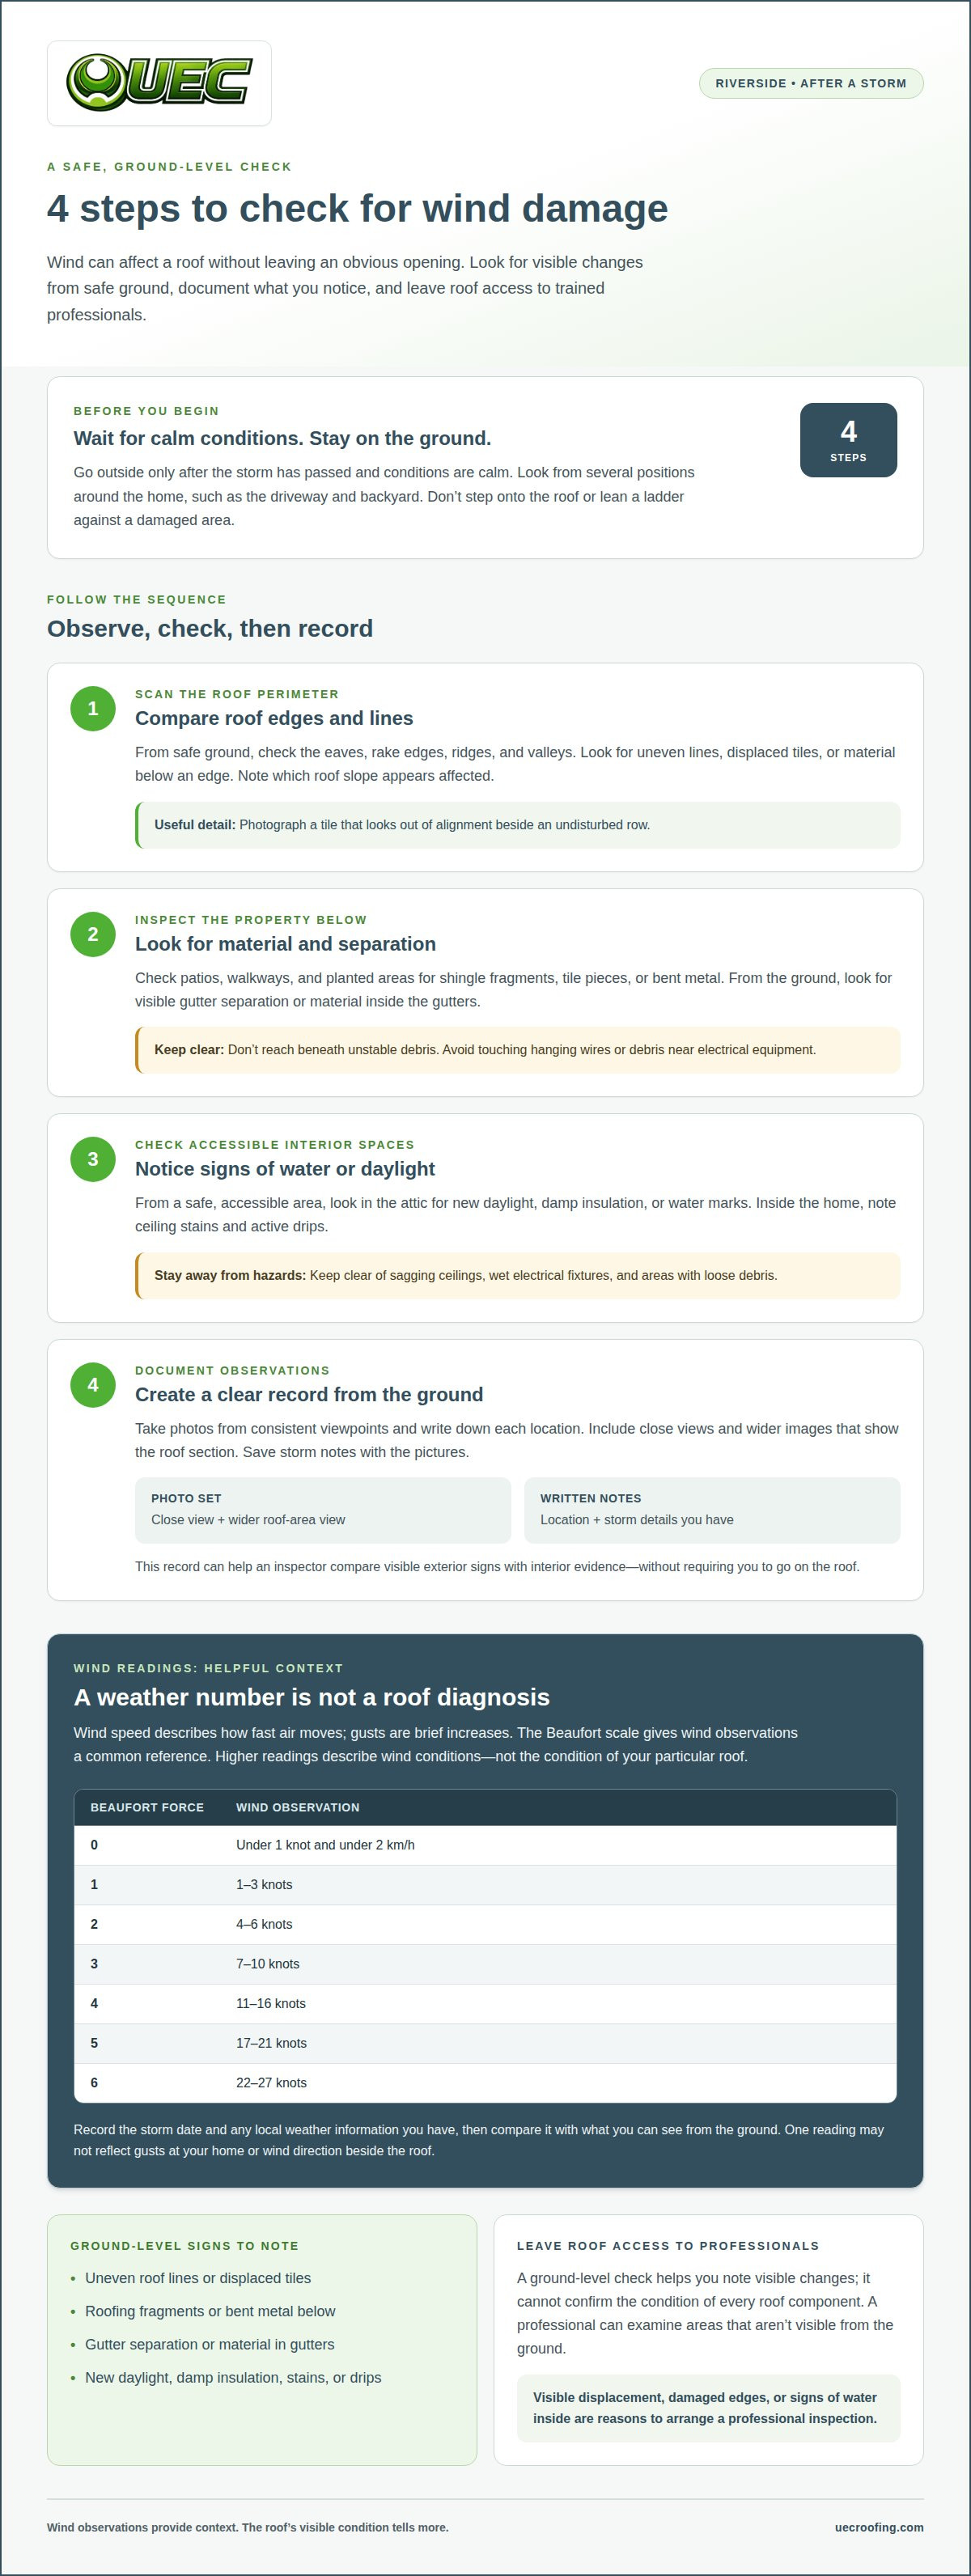
A ground-level inspection is a visual check made without climbing onto the roof. In Riverside, go outside only after the storm has passed and conditions are calm. Look from several positions around the home, including the driveway and backyard. Compare roof sections, edges, and ridgelines for visible changes. Don’t step onto the roof or lean a ladder against a damaged area.
Wind speed describes how fast air moves; gusts are brief increases. The Beaufort scale gives wind observations a common reference. Force 0 is under 1 knot and under 2 km/h. Force 1 corresponds to 1-3 knots, while force 2 corresponds to 4-6 knots. Force 3 corresponds to 7-10 knots; force 4, 11-16 knots. Force 5 is 17-21 knots, and force 6 is 22-27 knots. Higher readings describe wind conditions, not the condition of your roof.
A wind reading provides context, not a roof diagnosis. A weather observation can’t show whether a particular tile shifted or flashing loosened. Record the storm date and any local weather information you have, then compare it with what you can see from the ground. A single reading may not reflect gusts at your home or wind direction beside the roof.
Step one: scan the roof perimeter. Check the eaves, rake edges, ridges, and valleys from safe ground. Look for uneven lines, displaced tiles, or material below an edge. Note which roof slope appears affected. For example, photograph a tile that looks out of alignment next to an undisturbed row.
Step two: inspect the property below. Shingle fragments, tile pieces, or bent metal can indicate a roof concern. Check patios, walkways, and planted areas without reaching beneath unstable debris. From the ground, look for visible gutter separation or material inside the gutters. Avoid touching hanging wires or debris near electrical equipment.
Step three: check accessible interior spaces. An attic is the space beneath the roof deck. From a safe, accessible area, look for new daylight, damp insulation, or water marks. Inside the home, note ceiling stains and active drips. Keep clear of sagging ceilings, wet electrical fixtures, and areas with loose debris.
Step four: document observations. Take ground-level photos from consistent viewpoints and write down each location. Include close views and wider images that show the roof section. Save storm notes with the pictures. This record helps an inspector compare visible exterior signs with interior evidence, without requiring you to go on the roof.
What are signs of wind damage to shingles, tiles, flashing, and roof vents?
Shingles are overlapping roof pieces that shed water toward the eaves. After wind, look for lifted corners, creases, missing pieces, or shingles in the yard. A creased shingle may have bent and lost its flat shape. Dark patches can indicate that the underlying layer is exposed. From the ground, compare neighboring rows for uneven edges or gaps. Don’t pull or press roofing material to test whether it moves. A loose shingle can tear further, and walking on the roof adds fall risk. Photograph visible changes beside intact sections for comparison.
Roof tiles are hard coverings placed in overlapping courses across a roof. Wind damage may leave a tile shifted sideways, tilted, cracked, or missing. Look for an irregular line where one row meets the next. A broken tile in a planting bed may point to the roof slope that needs closer attention. A tile may also look intact even if its position has changed. Don’t assume a small visible shift means only one tile is affected. Record the location and surrounding pattern, then leave a closer inspection to a qualified professional.
Flashing is sheet material that seals roof joints and transitions. It commonly appears near chimneys, roof valleys, walls, and skylights. Wind can loosen an exposed edge or pull material away from the adjoining surface. Look for a lifted strip, visible gap, or bent metal near a chimney. Water marks below that joint can point to a leak path. A gap matters even if the rest of the roof looks orderly. Don’t apply sealant from a ladder. It may hide evidence without restoring the joint.
Roof vents are openings or covers that allow air to move through the roof or attic system. From the ground, check for a tilted cap, missing cover, or visible separation around the base. A vent that no longer sits level may have loosened during a gust. Compare it with nearby vents on the same roof plane. Inside, a new stain near a vent can help identify where water entered. Keep clear of dangling parts, and don’t reach onto the roof to steady them.
Wind damage can involve several materials on one roof slope, not just the most obvious missing piece. For example, a shifted tile near a wall and a lifted flashing edge deserve separate notes. List each location, photograph the wider roof area, and include a closer view where safely possible. A professional roof damage assessment can help determine whether visible changes affect the roof’s weather protection.
When should a professional inspect a roof after wind damage?
A professional roof inspection assesses roofing materials and connections. Arrange one when wind leaves visible displacement, damaged edges, or signs of water inside. In Riverside, a calm day after a storm makes exterior observations easier, but it doesn’t make roof access safe for homeowners. A professional can examine areas that aren’t visible from the ground. This matters when a roof looks intact but a vent base or flashing joint may have shifted.
Active water entry means moisture is entering the home through the roof. Treat a ceiling drip, spreading stain, or wet attic material as a reason to arrange an inspection. Note the room and location of each mark. For example, a stain beneath a roof valley can help focus the inspection. Keep clear of sagging ceilings and wet electrical fixtures. Don’t climb onto the roof to locate the opening.
Exposed underlayment is the protective layer beneath shingles or tiles. Arrange an assessment if wind has removed roofing material and left this layer visible. Missing pieces can leave a path for water, especially around roof edges and penetrations. A roof penetration is an opening for a feature such as a vent. Photograph the area from the ground, then note whether the opening appears uncovered or damaged.
Loose or displaced components are roofing parts that no longer sit in their usual position. A professional inspection is appropriate when tiles appear out of line, flashing has lifted, or a roof vent leans. These details matter even without a ceiling stain. Wind may loosen a connection before water becomes visible indoors. Record each roof slope and feature separately so the inspector can compare locations rather than relying on one close-up.
Use these signs to decide how quickly to arrange an assessment:
- Water indoors: Note active drips, fresh stains, or damp attic areas. Protect belongings without touching wet wiring or unstable ceilings.
- Open roof surface: Photograph missing shingles, tiles, or visible underlayment from a safe position.
- Changed roof details: Record lifted flashing, shifted ridge materials, or a tilted vent.
- Debris near the home: Save a clear photo of roofing fragments and the roof area above them.
Deferred damage is a problem that becomes noticeable after the storm. A ceiling mark may appear later, or a leak may emerge during subsequent rain. Keep dated photos and notes together, including which room or roof slope shows a change. If new moisture appears, update the record and arrange an inspection. A wind damage roof inspection in Riverside can connect those observations with the roof’s visible condition.
Does homeowners insurance cover wind damage to roofs in California
Homeowners insurance is a property policy that describes covered losses and claim conditions. For a California roof, policy wording and evidence about the damage determine how a wind claim is evaluated. A wind event alone doesn’t establish that a particular roof repair qualifies. For example, a lifted shingle after a storm and a worn shingle that later detached may be treated differently under the contract. Read the policy’s covered-cause language alongside the visible roof condition.
A covered cause is an event the policy identifies as eligible for coverage. Find the wording about wind, storms, roof damage, and exclusions. Then compare it with the observed damage, such as missing shingles, displaced tiles, or loosened flashing. Don’t assume every roof problem after windy weather has the same cause. A documented storm date, photographs, and an inspection report can help describe what changed and where. Keep observations factual rather than assigning a cause you can’t establish.
An exclusion is policy language describing a loss or condition that isn’t covered. Review clauses addressing wear, deterioration, maintenance, and repeated water entry. For example, a new opening beside older deteriorated roofing raises different questions than a clearly displaced component. The insurer evaluates the policy wording and submitted evidence. Keep prior repair records and earlier roof photographs together, if available. They can help distinguish a recent change from conditions that existed before the storm.
A deductible is the portion of a covered loss assigned to the policyholder under the contract. Find its amount and calculation method in the policy documents before deciding how to proceed. Don’t confuse the deductible with a contractor’s estimate. They answer different questions: one concerns the policyholder’s share, while the estimate describes proposed repair work. Avoid approving a full replacement based only on a weather report or informal roof observation.
Actual cash value and replacement cost are different ways a policy may describe claim valuation. Actual cash value generally accounts for depreciation; replacement-cost wording addresses the cost of replacing damaged property under the policy terms. Check which wording applies to the roof and whether conditions apply to payment. Don’t assume the same valuation applies to every part of a home policy. The declarations and policy forms provide the relevant details.
For a California claim, organize the record before contacting the insurer:
- Save the policy, declarations, and applicable roof provisions.
- Record the storm date, visible damage locations, and any interior leaks.
- Keep dated photos, inspection findings, estimates, and repair records.
- Ask the insurer to explain its written decision against the policy language.
A wind damage roof inspection in Riverside can document roof conditions; the policy determines how those findings relate to coverage.
For broader context, the data update’s Excel file contains 61 tabs covering wind-sector data and trends. That material describes sector data and trends; it does not establish the condition of an individual roof or determine whether a specific loss meets policy terms. Keep the claim assessment grounded in the policy language and evidence about the observed damage.
Riverside permits and codes for wind-damaged roofs
A building permit is approval from the authority responsible for construction work. Whether roof repairs in Riverside need one depends on the property’s jurisdiction and proposed work. A house inside the City of Riverside and a property in unincorporated Riverside County may fall under different local processes. Start by identifying the exact property address and its governing building department. Don’t assume a storm-related repair automatically skips permit review.
Repair scope means the specific work planned for the damaged roof. Replacing a few displaced shingles differs from replacing roofing across a larger area. Work involving roof decking, structural framing, or a changed roof configuration raises different review questions. Write down which materials and roof sections are affected, and whether the plan covers surface materials only or includes underlying components. That description helps the relevant department determine which requirements apply.
Building codes are requirements that govern construction work within a jurisdiction. For a Riverside roof project, applicable code review can depend on the local authority, work scope, and permit decision. Don’t assume older roof details automatically qualify for new work. If a permit applies, ask which plans, product details, or inspections the project requires. Keep the response with your repair records. The answer should relate to the property address and written scope, not just the phrase “wind damage.”
Use this practical sequence before work begins:
- Confirm jurisdiction: Match the property address to the City of Riverside or the appropriate county jurisdiction.
- Describe the damage: Note affected roof slopes, materials, and whether water entered the home.
- Define the repair: Separate surface replacement from work involving decking or structural components.
- Seek a permit determination: Give the responsible building department the address and written scope.
- Keep project records: Save the determination, permit documents, inspection notes, and completed-work description.
Permit records document approvals and required inspections for a project. If the department requires an inspection, confirm its timing before covering the work. For example, concealed decking repairs may need review before new roofing materials hide them. Keep dated photographs of exposed areas and completed repairs. These records can help explain the work later, especially if another roof issue appears.
Emergency protection is temporary action that limits further exposure while permanent work is assessed. If wind leaves an opening, record its location and ask the building department how local procedures apply to urgent protective work. Don’t treat temporary covering as approval for a larger repair. For a Riverside roof project, matching the address, scope, and permit decision helps prevent avoidable confusion.
UEC Roofing: leak repair
UEC Roofing provides leak repair when wind damage leaves a roof vulnerable to water entry. Its brick-and-mortar presence in Lake Elsinore and more than 2,000 successful regional projects reflect a local foundation across Southern California. Homeowners in Riverside and the Inland Empire, as well as Orange and San Diego Counties, face varied roof conditions that call for careful attention to damage and maintenance needs.
For a wind-related leak or roof concern, contact UEC Roofing to discuss the next step. Contact UEC Roofing about wind damage.
Take the Next Step Toward a Sound Roof
A clear record of roof conditions gives you a practical starting point for deciding what needs attention. Keep inspection photos, repair notes, and any claim or permit documents together. If new moisture appears or roofing components remain displaced, use those details to explain the concern and plan the next step.
A wind damage roof inspection in Riverside can help connect visible roof changes with the work that may be needed. UEC Roofing provides leak repair, roof repair, and roof tune-ups for homeowners addressing roofing concerns. The right solution depends on the roof’s condition and the specific issue observed.
For a measured next step, contact UEC Roofing about wind damage. A well-documented roof concern is easier to discuss, and thoughtful attention can help you move forward with confidence.
Frequently Asked Questions
What roof damage can high winds cause in Riverside, California?
High winds can damage roof-edge components and connections, not just the main roof covering. Gusts may loosen fascia or soffit panels, disturb ridge caps, or pull gutter attachments away from the eaves. Wind pressure can also strain areas where roof sections meet walls. After a storm in Riverside, note damage to these adjoining parts too, since issues beyond the visible roof surface can affect how water is directed away from the home.